Thursday, March 12, 2015

How to Crochet a Ninja Turtle Mask w/ Pipe cleaners

How to Crochet a Ninja Turtle Mask w/ Pipe cleaners


Hey everyone!

After numerous attempts at following some free crochet patterns for Ninja Turtle Masks, I've decided to make my own pattern. All of the patterns I've found don't seem to work for kids, or adults for that matter.  The eye holes don't stay open enough, so they were really bothering my son.  I thought about it and decided I would try to make one around a pipe cleaner and it worked like a charm! My little guys love running around in the masks now that they aren't in their eyes!

So here goes: (Please note I'm new to writing patterns, I usually just wing it, so if something seems off please comment and let me know!)

Materials:
Worsted Weight Yarn
5.00 MM Crochet Hook
Pipe Cleaners in various colors (I try to match the pipe cleaner to the color mask I'm making, there may be a few spots where the pipe cleaner shows through)

Stiches:
Single Crochet
Double Crochet


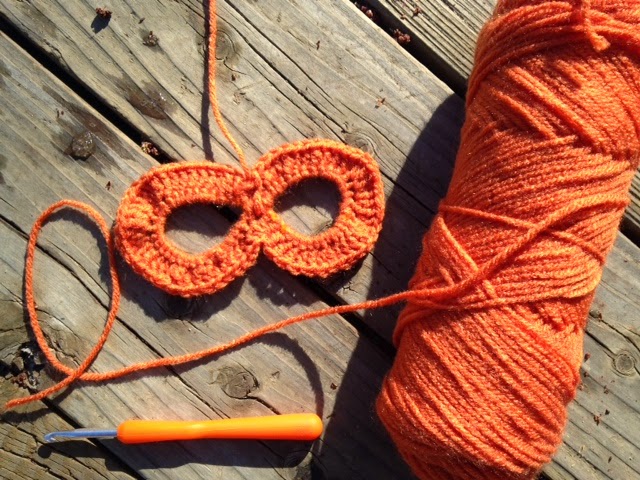
Start out by making a figure 8 with your pipe cleaner.  I usually put the part that is twisted to hold it together on the side so later when we are crocheting on the straps we will cover the ends of the pipe cleaner.

 
Next I tie the string with a regular knot on the middle of the figure eight. (Like I said I'm new to patterns so there may be a better way to make the knot but I like to make sure everything is really secure since kids will be playing with them so I use a regular knot) Then you single crochet 30 around one loop of the figure 8.  When you get back to the middle I crochet 1 single crochet in the middle then 30 single crochets around the other side.

 
Next we start the outside layer.  Start by doing one double crochet in each of the next 13 stiches. Two double crochets in the next 4 stiches.  Then one double crochet in the remaining 12 stiches on that side. When you get back to the middle is where it gets a little tricky. You should have one more stich left on the loop, and the single crochet stich in the middle.  I'm not sure the correct term, I think it's a triple double crochet decrease.
 
(Put your needle through the last stich in the first eyehole, yarn over, put your needle through the middle stich - the one in between the two eye holes - yarn over, put your needle in the first stich of the second eye hole, yarn over, pull your needle through ALL of the loops.) Did you get all of that? MSG me with any questions!
 

So now we're onto the second eye hole. Start by doing one double crochet in each of the next 12 stiches. Two double crochets in the next 4 stiches.  Then one double crochet in the remaining 12 stiches on that side.


 Now you have to do the tricky double crochet decrease again...  (Put your needle through the last stich in the first eyehole, yarn over, put your needle through the middle stich - the one in between the two eye holes - yarn over, put your needle in the first stich of the second eye hole, yarn over, pull your needle through ALL of the loops.) Did you get all of that? MSG me with any questions!  Fasten off and weave in the end.

Now you're done with the actual mask part, you just have to add the straps! :) The hard part is over.

 For the straps, from the middle count over 13 stiches. Attach your yarn and do one double crochet in the next 5 stiches. Chain 2, turn your mask over and double crochet across 5 stiches.  Continue this until you have approximately 45 rows.  (You can make them longer or shorter depending on the person you are making it for) Row 46 you double crochet decrease twice, chain 2. Row 47 Double Crochet decrease once. Fasten off and weave in end. 

Repeat this process for the strap on the other side and you're all done! Congrats, you did it!! I hope you find this tutorial helpful, they are some awesome masks that kids and adults both love!


If this helped you like my blog for more crafts and ideas to come! Thanks for Reading!

PS. If you just can't figure this out but really want some masks for your little ones you can purchase them from my Etsy shop! Like my blog and etsy shop for FREE shipping! :)

https://www.etsy.com/listing/223812906/8-crochet-ninja-turtle-superhero-masks?

Saturday, March 7, 2015

How to make a Multi-Strand Seed Bead Bracelet

How to make a Multi-Strand Seed Bead Bracelet

Hey Everyone,

Today I made a multi-strand bead bracelet. It's a great beginner bracelet to make so I thought I would show you how!


I started by laying out all of my materials.

Materials:
1 Pack Seed Beads
.5mm Magic Cord (You can use any string your beads will fit through, I just like the elasticity of this cord)
14 Silver Crimp Beads
7 Strand Spacer Bar
Lobster Clasp
O rings
Jewelry Pliers
 

I started by adding the lobster clasp to the O ring, then before closing the O ring also add on the spacer bar.

I have a piece of wood with a  picture hanger nailed to it to hold the bracelet while I am working on it. Which it why I add the O ring and lobster clasp first so I have something to hook onto the picture hanger.

Once the spacer bar is all set up I add all of the strands of magic wire. I like to do this all at once so once I start stringing the beads I can just keep going until they are all on. It's a matter of preference, you can add one at a time and string the beads if you want.  I added 2 strands of stretch magic per hole on the spacer bar. So 14 strands total.  Each strand measures 11" long. Working with a bit of extra string will make it easier to tie off at the end.

Once I get all 14 strands tied to the spacer bar, I add 1 crimp bead per 2 strands of string. 1 Crimp bar per hole in the spacer bar, so 7 across. You can see this whole setup in the photo below.

 
Next is stringing all of the beads.  This is an easy task but VERY time consuming... :) You can lay out the sets of beads first or just pick through your pack as needed. At the beginning I was counting out the sets, I got a few strands deep and decided to just pick through as I went. It seemed to make the process a bit faster..
 
For a bracelet that measures 8" in length (including the clasp hardware) I strung 6' of beads.  If you're using the same seed beads I used that equals out to:
 
20 Color A - Purple
10 Color B - Green
20 Color C - Light Purple


Once all of the beads are strung I began tying off the ends to the second spacer bar. After the two were tied per hole I would pinch on the crimp bead right away to keep it secure.  Move along the 7 holes and tie everything off.  Once tied off I weave in the ends to the beads about 6-7 beads down to make sure there is enough tail to keep everything tied and in place.  If you cut the tails off right at the crimp beads I would add a dab of super glue before you crimp down to make sure its nice and secure.  Then add the second O ring to the second spacer bar and attach to the O from the lobster clasp.


There you have it, you've created a beautiful bracelet for a portion of the cost of one at the store! I hope you enjoyed learning how to make it with me.  Leave any comments or questions below!

And of course, if you would rather just have me do all of the work you can purchase mine here: https://www.etsy.com/listing/225364460/handmade-multi-strand-bracelet-violet

Thanks for reading!! :)

Friday, March 6, 2015

Introduction

Hi!

My name is Amy, I'm a stay at home mom of 2 little boys taking a stab at the blogging world. There isn't a day that goes by that I'm not working on some type of craft.  I have an Etsy shop that I'm trying to make extra money for our household with. Story of our lives right? Always trying to find a way to make extra money..

I started out with just posting Crochet items. I was super successful during the winter months and Christmas time, but as we all know Spring is near.... I doubt people will be ordering hats in the spring! ;) So recently I started making jewelry, in the near future I'll be learning how to crochet onto clothing items. I have so many ideas to start working on, I'll be showing how to do all of these things in this blog.

Thanks for taking the time to read this, and I hope you like what all is coming!